通过代码创建和删除节点
 That's great when everything is available in the scene from the outset, but more often than not some objects should be created and deleted at runtime.当场景中的所有对象都已预先设置好时固然方便,但更多时候我们需要在运行时动态创建和删除对象。
Creating and deleting nodes at runtime as almost as easy as in the Editor. The basic set of actions is as follows:在运行时创建和删除节点几乎和在编辑器中操作一样简单。基本操作步骤如下:
- Creation. To create a node we should call a constructor of the corresponding class by using the new keyword and providing construction parameters, if necessary.创建节点:通过new关键字调用对应类的构造函数,必要时提供构造参数
- Deletion. To delete a node we simply call the DeleteLater() method for the node we are going to remove.删除节点:对要移除的节点调用DeleteLater()方法
In general, the code will look as follows:通常,代码实现方式如下:
// 创建名为nodename的NodeType类型节点
<NodeType>Ptr nodename = <NodeType>::create(<construction_parameters>);

// 删除该节点
nodename.deleteLater();
Now let us illustrate the process of loading a node from a *.node file from disk using a NodeReference class.下面演示如何使用 NodeReference 类从磁盘加载 *.node 文件中的节点:
// 磁盘上*.node资源文件的路径
String placeablePath = "mynodefile.node"

// 指定生成点的变换(位置、旋转和缩放)
NodePtr spawnPoint;

// 从指定的*.node文件加载节点
NodeReferencePtr placeable = NodeReference::create(FileSystem::guidToPath(FileSystem::getGUID(placeablePath.get())));

// 使用spawnPoint的变换放置新节点
placeable->setWorldTransform(spawnPoint->getWorldTransform());
You can also create new nodes of various built-in classes, for example create Static Mesh. Just provide the asset file path to a class constructor.同样,你也可以创建各种内置类型的节点,例如创建Static Mesh(静态网格)物体,只需将资源文件路径传递给类构造函数即可:
// 磁盘上资源文件的路径
String meshAssetPath = "mynodefile.node"

// 指定生成点的变换(位置、旋转和缩放)
public Node spawnPoint;

//  检查文件是否存在
if (FileSystem::isFileExist(FileSystem::guidToPath(FileSystem::getGUID(meshAssetPath.get())))
{
	// 从指定网格资源路径创建Static Mesh
	ObjectMeshStaticPtr mesh = ObjectMeshStatic::create(FileSystem::guidToPath(FileSystem::getGUID(meshAssetPath.get())));
	// 使用spawnPoint的变换放置新节点
	placeable->setWorldTransform(spawnPoint->getWorldTransform());
}Practice实践#
For our project, let's create the ObjectPlacer component that will place the specified objects in the scene at the specified points (NodeDummy) and the Removable component that will allow us to remove objects by right-clicking. Destroying is always easier that creating, so let's start simple — create the Removable component by inheriting it from Interactable. As a click action, it will simply remove the node to which it is assigned.对于我们的项目,让我们创建一个 ObjectPlacer 组件,用于将指定的物体放置到场景中的指定点(NodeDummy)上,以及一个 Removable 组件,用于通过右键点击删除物体。破坏总是比创建容易,所以我们先从简单的开始 —— 创建 Removable 组件,并让它继承自 Interactable。在点击操作中,它将简单地移除被赋予该组件的节点。
#pragma once
#include <UnigineComponentSystem.h>
#include "Interactable.h"
class Removable :
    public Interactable
{
public:
	// 声明类的构造函数和析构函数,并定义与组件关联的属性(property)名称
	// 首次运行应用后将在项目data目录生成包含以下参数的Removable.prop文件
	COMPONENT_DEFINE(Removable, Interactable);

	// 注册将在世界逻辑各阶段调用的方法(方法在protected部分声明)
	COMPONENT_INIT(init);
	// 重写Action方法用于删除受控节点
	void action(int num = 0);
protected:
	// 声明将在世界逻辑各阶段调用的方法
	void init();
};#include "Removable.h"
// 注册Removable组件
REGISTER_COMPONENT(Removable);
using namespace Unigine;
using namespace Math;
void Removable::init()
{
// 设置鼠标悬停时显示的提示文本
tooltip = Unigine::String::format("右键点击可移除该对象");
}
// 重写Action方法用于删除受控节点
void Removable::action(int num)
{
// 非零操作编号对本组件无效,直接忽略
if (num != 0)
return;
// 移除挂载该组件的节点
node.deleteLater();
}Now let's deal with the placer component.接着创建对象放置组件:
-
Create a new component, name it ObjectPlacer, and add the following code into it:创建一个新组件,命名为 ObjectPlacer,并将以下代码添加到其中:ObjectPlacer.h
#pragma once #include <UnigineComponentSystem.h> class ObjectPlacer : public Unigine::ComponentBase { public: // 声明类的构造函数和析构函数,并定义与组件关联的属性(property)名称 // 首次运行应用后将在项目data目录生成包含以下参数的ObjectPlacer.prop文件 COMPONENT_DEFINE(ObjectPlacer, ComponentBase); // 注册将在世界逻辑各个阶段调用的方法(方法声明在下面的 protected 区域中) COMPONENT_INIT(init); // 将参数分为两个组:第一个对象和第二个对象 PROP_GROUP("First_Object_Placement") PROP_PARAM(File, placeable, NULL); PROP_PARAM(Node, spawnPoints1, nullptr); // 生成点层级结构的根节点 PROP_GROUP("Second_Object_Placement") PROP_PARAM(File, meshAsset, NULL); PROP_PARAM(Material, meshMat, nullptr); PROP_PARAM(Node, spawnPoints2, nullptr); // 生成点层级结构的根节点 protected: // 声明将在世界逻辑各阶段调用的方法 void init(); };ObjectPlacer.cpp#include "ObjectPlacer.h" #include "Removable.h" // 注册 ObjectPlacer 组件 REGISTER_COMPONENT(ObjectPlacer); using namespace Unigine; using namespace Math; void ObjectPlacer::init() { // 检查是否指定了包含目标对象的 node 文件,并且是否指定了位置点列表 if (FileSystem::isFileExist(FileSystem::guidToPath(FileSystem::getGUID(placeable.getRaw()))) && (spawnPoints1 != NULL)) { // 加载指定的 .node 资源内容,并将其放置在由指定列表的 // 子节点标记的每个点上(Spawn-points,生成点) for (int i = 0; i < spawnPoints1->getNumChildren(); i++) { NodeReferencePtr node_ref = NodeReference::create(FileSystem::guidToPath(FileSystem::getGUID(placeable.getRaw()))); node_ref->setWorldTransform(spawnPoints1->getChild(i)->getWorldTransform()); ComponentSystem::get()->addComponent<Removable>(node_ref); } } // 检查是否指定了用于创建Static Mesh(静态网格)对象的 *.mesh 文件,并且是否为其指定了位置点列表 if (FileSystem::isFileExist(FileSystem::guidToPath(FileSystem::getGUID(meshAsset.getRaw()))) && (spawnPoints2 != NULL)) { // 放置在由指定列表的子节点标记的每个点上(Spawn-points,生成点) for (int i = 0; i < spawnPoints2->getNumChildren(); i++) { // 使用指定的 *.mesh 资源创建Static Mesh(静态网格)对象,并为其设置指定的材质 ObjectMeshStaticPtr mesh = ObjectMeshStatic::create(FileSystem::guidToPath(FileSystem::getGUID(meshAsset.getRaw()))); mesh->setName(String::format("generated_mesh_%d", i)); mesh->setMaterial(meshMat, "*"); mesh->setWorldTransform(spawnPoints2->getChild(i)->getWorldTransform()); mesh->setIntersection(true, 0); // 为该节点添加 Removable 组件,使我们可以通过右键删除节点 ComponentSystem::get()->addComponent<Removable>(mesh); } } } -
Let's save our files and then build and run our application by hitting Ctrl + F5 to make the Component System generate a property to be used to assign our component to nodes. Close the application after running it and switch to UnigineEditor.请保存文件后按下 Ctrl + F5 编译并运行应用程序,使组件系统生成用于将组件分配给节点的property(属性)文件。运行完成后关闭应用,切换至 UNIGINE 编辑器。Now let's find the interior node (NodeDummy) and assign our ObjectPlacer property to it.现在我们来找到interior节点(NodeDummy),并将我们的 ObjectPlacer 属性(property)赋给它。
-
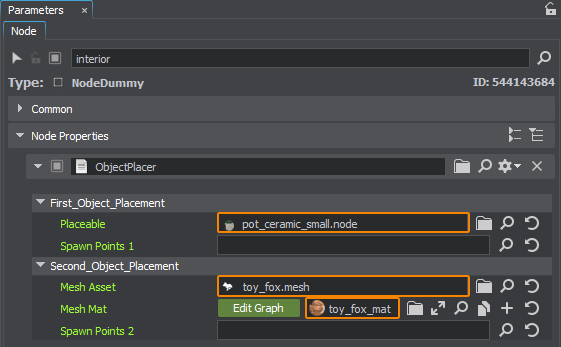
The parameters of the component are divided into two groups: the first one is for placement of the specified *.node asset, and the second one is for generation of Mesh Static objects from the specified *.mesh asset and assignment of the specified material. Next, let's assign a flower (the pot_ceramic_small.node asset) to the Placeable field in the First Object Placement group, toy_fox.mesh and toy_fox_mat material to the Mesh Asset and Mesh Material fields in the Second Object Placement group. 组件的参数被分为两组:第一组用于放置指定的 *.node 资源,第二组用于根据指定的 *.mesh 资源生成Mesh Static(静态网格)对象,并为其分配指定的材质。接下来,在 First Object Placement 组中将花卉(例如 pot_ceramic_small.node 资源)分配给 Placeable 字段,在 Second Object Placement 组中将 toy_fox.mesh 和 toy_fox_mat 材质分别分配给 Mesh Asset 和 Mesh Material 字段。
-
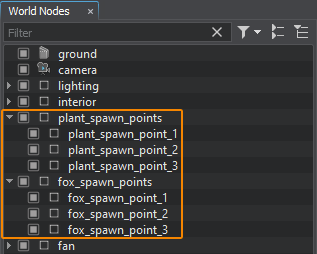
Next, let's define the points to place flowers: create a NodeDummy, name it plant_spawn_points and create several NodeDummy children for it (by clicking on it in the World Hierarchy and choosing Create → Node → Dummy), name them plant_spawn_point_1, plant_spawn_point_2 and plant_spawn_point_3 respectively and place them in the scene in the places where we need flowers. Do the same for the fox figure. We will have the following hierarchy:然后定义花卉的放置点:创建一个 NodeDummy,命名为 plant_spawn_points,为它创建几个子 NodeDummy(在 World Hierarchy 中点击它并选择 Create → Node → Dummy),分别命名为 plant_spawn_point_1、plant_spawn_point_2 和 plant_spawn_point_3,并将它们放置在场景中希望显示花的位置。对于狐狸模型,同样操作。最终我们将得到如下结构层级:
-
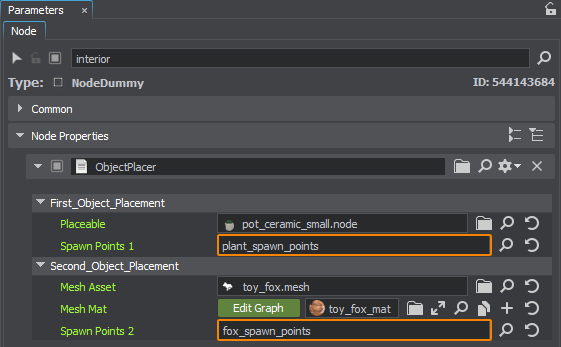
Now drag the plant_spawn_points and fox_spawn_points nodes to the Spawn Point fields in the corresponding groups of the ObjectPlacer component:现在将 plant_spawn_points 和 fox_spawn_points 节点分别拖拽到 ObjectPlacer 组件中对应组的 Spawn Point 字段中:
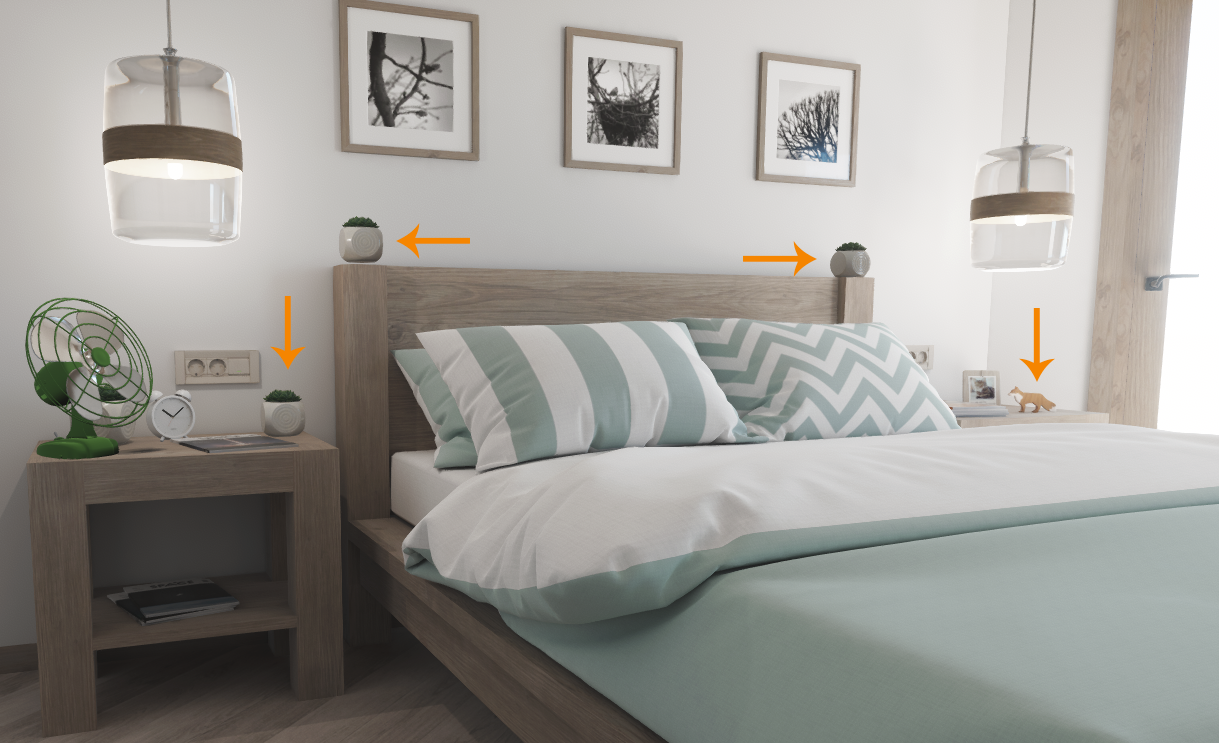
Save the world by hitting Ctrl + S. Switch to SDK Browser and launch our application by clicking the Run button on our project's card and check the spawned objects.按 Ctrl + S 保存场景。切换至 SDK Browser,点击项目卡片上的 Run 按钮启动应用程序,并检查生成的物体是否符合预期。
本页面上的信息适用于 UNIGINE 2.20 SDK.