用户界面
 In UNIGINE a Graphical User Interface (GUI) is composed of different types of widgets added to it. Basically, there are two ways of creating GUI:在UNIGINE中,图形用户界面(GUI)由添加到其中的不同类型的控件组成。基本上,有两种创建GUI的方式:
- By adding widgets to the system GUI (UNIGINE user interface) that is rendered on top of application window. In this case we use the Gui class.通过将控件添加到系统GUI(UNIGINE用户界面)中,该界面渲染在应用程序窗口的顶部。在这种情况下,我们使用 Gui 类。
- By adding widgets to a GUI object positioned in the world. In this case, any postprocessing filter can be applied. By creating a specific Gui object (or GuiMesh for arbitrary geometry) that can be placed anywhere in the scene, and adding widgets to it. This can be useful, for example, to implement interaction with the interface displayed on a computer screen in a room (i.e. UI bound to an object that can be viewed from different angles). In this case, a post-processing filter can be applied.通过将控件添加到一个位于世界中的GUI对象中。在这种情况下,可以应用任何后处理滤镜。通过创建一个特定的Gui对象(或用于任意几何形状的GuiMesh),可以将其放置在场景中的任何位置,并向其添加控件。例如,这可以用于实现与房间中计算机屏幕上显示的界面的交互(即绑定到可以从不同角度查看的对象的UI)。在这种情况下,可以应用后处理滤镜。
There are 2 ways to create the GUI layout:有2种方式创建GUI布局:
- Directly from code via GUI classes直接 通过GUI类从代码中创建。
- Using UI files with the description of user interface. Such a description file in XML-like format can be created for a complex interface to write less code.使用带有用户界面描述的UI文件。可以为复杂界面创建这种类似XML格式的描述文件,以减少代码编写量。
The following code demonstrates how to add Label and Slider widgets to the system GUI:以下代码演示了如何将Label和Slider控件添加到系统GUI中:
// 获取系统GUI的引用
gui = Gui::getCurrent();

// 创建Label控件并设置其参数
WidgetLabelPtr widget_label = WidgetLabel::create(gui, "标签文本:");
widget_label->setToolTip("这是我的标签!");
widget_label->arrange();
widget_label->setPosition(10, 10);

// 创建Slider控件并设置其参数
WidgetSliderPtr widget_slider = WidgetSlider::create(gui, 0, 360, 90);
widget_slider->setToolTip("这是我的滑动条!");
widget_slider->arrange();
widget_slider->setPosition(100, 10);

// 将控件添加到系统GUI
gui->addChild(widget_label, Gui::ALIGN_OVERLAP | Gui::ALIGN_FIXED);
gui->addChild(widget_slider, Gui::ALIGN_OVERLAP | Gui::ALIGN_FIXED);
In order to use GUI elements (not just watch them rendered) we must specify handlers for various events (click, change, etc.). The following code demonstrates how to set event handlers:要使用GUI元素(而不仅仅是观看它们的渲染效果),我们必须为各种事件(点击、更改等)指定处理程序。以下代码演示了如何设置事件处理程序:
// 用于管理事件订阅的EventConnections类实例
EventConnections econnections;

/// 当button1被点击时调用的函数
int onButton1Clicked(const WidgetPtr &button)
{
	/* .. */
}

/// 当滑块位置改变时调用的方法
int AppWorldLogic::onSliderChanged(const WidgetPtr &slider)
{
	/* .. */
}

int AppWorldLogic::init()
{
	// 获取系统GUI的引用
	GuiPtr gui = Gui::getCurrent();

	/* .. */

	// 订阅clicked事件,使用onButton1Clicked函数作为处理函数
	buttonwidget1->getEventClicked().connect(econnections, onButton1Clicked);

	// 设置AppWorldLogic::onSliderChanged方法作为widget_slider的changed事件处理函数
	widget_slider->getEventChanged().connect(econnections, this, &AppWorldLogic::onSliderChanged);
	/* .. */

	return 1;
}

int AppWorldLogic::shutdown()
{

	// 在shutdown时移除所有事件订阅
	econnections.disconnectAll();

	return 1;
}Practice实践#
In architectural visualization projects, a widespread option is changing materials on various objects, for example, to preview different wallpapers on the walls and match them with the decor of the furniture. For our project, let's create a component (also inherit it from Interactable) that displays a list of available materials for a selected object in the UI based on ObjectGui with the ability to select and automatically apply them.在建筑可视化项目中,一个常见的需求是更改各种对象的材质,例如预览不同墙纸与家具装饰的搭配效果。让我们为项目创建一个组件(同样继承自Interactable),该组件基于ObjectGui显示选定对象的可用材质列表,并提供选择和自动应用功能。
-
Create a new component called MaterialCustomizer and add the following code to it:创建名为MaterialCustomizer的新组件并添加以下代码:MaterialCustomizer.h
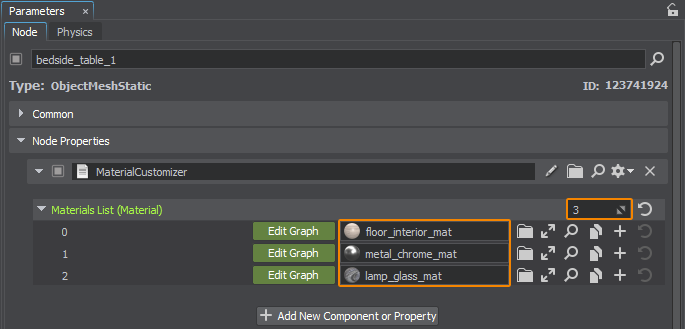
#pragma once #include <UnigineComponentSystem.h> #include "Interactable.h" class MaterialCustomizer : public Interactable { public: // 为我们的类声明构造函数和析构函数,并定义与组件关联的属性(property)名称 // 首次运行应用程序后,包含以下所有参数的MaterialCustomizer.prop文件将在项目的'data'文件夹中生成 COMPONENT_DEFINE(MaterialCustomizer, Interactable); // 用于对象定制的材质列表 PROP_ARRAY(Material, MaterialsList); // 注册将在世界逻辑相应阶段调用的方法(方法在protected部分声明) COMPONENT_INIT(init); // 实现上下文菜单的子组件重写的Action方法 void action(int num = 0); protected: // 声明将在世界逻辑相应阶段调用的方法 void init(); private: // 用于显示材质选择界面的GUI对象 Unigine::ObjectGuiPtr gui = nullptr; // 将菜单中选定的材质应用到选定对象表面的函数 void select_material_handler(const Unigine::WidgetPtr& w); // 用于管理事件订阅的EventConnections类实例 Unigine::EventConnections econn; };MaterialCustomizer.cpp#include "MaterialCustomizer.h" #include "InputProcessor.h" REGISTER_COMPONENT(MaterialCustomizer); using namespace Unigine; using namespace Math; // 该函数将菜单中选定的材质应用到当前选定对象的指定表面 void MaterialCustomizer::select_material_handler(const WidgetPtr& w) { Unigine::ObjectPtr object = checked_ptr_cast<Unigine::Object>(node); Unigine::WidgetComboBoxPtr combo_box = checked_ptr_cast<Unigine::WidgetComboBox>(w); object->setMaterial(MaterialsList[combo_box->getCurrentItem()], ComponentSystem::get()->getComponentInWorld<InputProcessor>()->intersection->getSurface()); } void MaterialCustomizer::init() { // 设置鼠标悬停时显示的提示文本 tooltip = "右键点击显示菜单,可选择对象材质"; // 创建用于显示材质选择界面的GUI对象并设置尺寸和分辨率 gui = ObjectGui::create(0.5f, 0.5f); gui->setScreenSize(600, 600); // 启用交互检测以便用鼠标操作UI gui->setIntersection(true, 0); // 使界面始终面向用户且不被其他对象遮挡 gui->setBillboard(true); gui->getMaterialInherit(0)->setDepthTest(false); // 禁用黑色背景并暂时隐藏UI gui->setBackground(false); gui->setEnabled(false); // 设置可交互距离 gui->setControlDistance(10); if (MaterialsList.size() > 0) { // 添加WidgetVBox容器实现元素垂直布局,设置间距 WidgetVBoxPtr vbox = WidgetVBox::create(gui->getGui()); vbox->setSpace(20, 20); // 启用背景并设置颜色 vbox->setBackground(1); vbox->setBackgroundColor(vec4(0.1f, 0.5f, 0.1f, 0.4f)); // 创建WidgetLabel显示标题,设置位置和字体大小 WidgetLabelPtr label = WidgetLabel::create(gui->getGui(), "选择材质:"); label->setFontSize(50); // 将Label控件添加到容器 vbox->addChild(label, Gui::ALIGN_TOP); // 创建WidgetComboBox显示材质下拉列表 WidgetComboBoxPtr mat_menu = WidgetComboBox::create(gui->getGui()); mat_menu->setFontSize(40); // 为列表项选择事件设置处理函数 mat_menu->getEventChanged().connect(econn, this, &MaterialCustomizer::select_material_handler); // 根据材质列表添加菜单项 for (int i = 0; i < MaterialsList.size(); i++) { Unigine::String str = FileSystem::getVirtualPath(MaterialsList[i].get()->getFilePath()); mat_menu->addItem(str.substr(str.rfind("/") + 1)); } // 将ComboBox控件添加到容器 vbox->addChild(mat_menu, Gui::ALIGN_TOP); // 将容器控件添加到GUI gui->getGui()->addChild(vbox, Gui::ALIGN_EXPAND | Gui::ALIGN_OVERLAP); } } // 子组件实现的操作方法重写 void MaterialCustomizer::action(int num) { // 忽略非零操作索引 if (num != 0) return; // 将GUI放置在点击点附近 gui->setWorldPosition(ComponentSystem::get()->getComponentInWorld<InputProcessor>()->intersection->getPoint()); // 隐藏其他可定制对象的GUI(如果有) Unigine::Vector<MaterialCustomizer*> customizer_components; ComponentSystem::get()->getComponentsInWorld(customizer_components); for (MaterialCustomizer* customizer : customizer_components) if (this != customizer) customizer->gui->setEnabled(false); // 切换当前对象的材质选择界面显示状态 gui->setEnabled(!gui->isEnabled()); }Let's save our files and then build and run our application by hitting Ctrl + F5 to make the Component System generate a property to be used to assign our component to nodes. Close the application after running it and switch to UnigineEditor.让我们保存文件后按下 Ctrl + F5 构建并运行应用程序,使组件系统生成用于将组件分配给节点的属性(property)文件。运行后关闭应用程序并切换至 UnigineEditor。 - Assign our new property to the bedside_table_1 object in our scene.将新生成的属性(property)分配给场景中的 bedside_table_1 对象。
-
Fill in the list of materials. To do this, change the number of items in the list from 0 to 3 and then drag three materials into the corresponding fields.填充材质列表。为此,将列表中的项目数从 0 改为 3,然后将三个材质拖到相应的字段中。
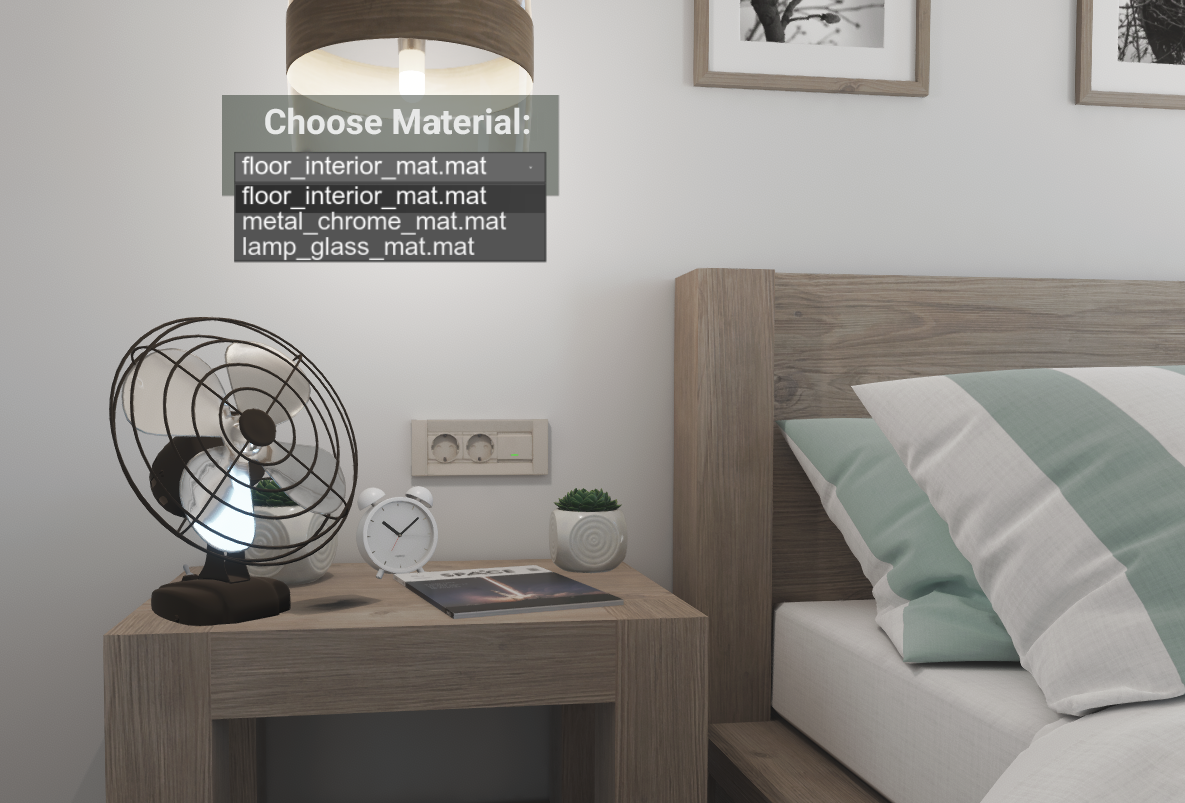
Upon right-clicking an object a list of available materials will be displayed, you can choose the desired one, and it will be applied automatically right as you click it:右键单击对象时,将显示可用材质列表,你可以选择所需的材质,当你点击它时会自动应用该材质:
本页面上的信息适用于 UNIGINE 2.20 SDK.