材质管理
 Changing parameters of the material assigned to the object surface via code, and replacing one assigned material with another.通过代码更改分配给对象表面的材质参数,以及将已分配的材质替换为另一个材质。
Materials can be operated not only in the Editor — sometimes it is required to assign materials via code (in case of procedural content generation, for example) or configure some of their parameters. To control materials via API, we use the following two classes:材质不仅能在编辑器中操作,有时也需要通过代码来分配(例如程序化内容生成)或配置参数。我们使用以下两个API类来管理材质:
- Materials class that represents an interface for managing loaded materials (this is a manager class that can help you find a required material, for example).Materials类:用于管理已加载材质的接口(这是一个管理器类,可帮助查找所需材质)
- Material class that is used to manage each individual material.Material类:用于管理每个独立材质
The following example demonstrates how to inherit a new material from the base one, which is called mesh_base.以下示例演示如何从mesh_base基础材质继承创建新材质:
#include <UnigineMaterials.h>
#include <UnigineObjects.h>
#include<UniginePrimitives.h>
using namespace Unigine;

/* .. */

int AppWorldLogic::init()
{

	// 创建立方体 (ObjectMeshDynamic 节点)
	ObjectMeshDynamicPtr my_mesh = Primitives::createBox(vec3(1.5f, 1.5f, 1.5f));

	// 获取要继承的mesh_base基础材质
	MaterialPtr mesh_base = Materials::findManualMaterial("Unigine::mesh_base");

	// 继承创建子材质
	MaterialPtr my_mesh_base = mesh_base->inherit();

	// 将子材质保存到"materials/my_mesh_base0.mat"
	// (保存前该材质仅存在于内存中,应用关闭后会被删除)
	my_mesh_base->createMaterialFile("materials/my_mesh_base0.mat");

	// 将材质反照率颜色设为红色
	my_mesh_base->setParameterFloat4("albedo_color", Math::vec4(255, 0, 0, 255));

	// 将材质my_mesh_base0.mat分配给my_mesh对象(ObjectMeshDynamic)的第0个表面
	my_mesh->setMaterialPath("materials/my_mesh_base0.mat", 0);

	// 将材质my_mesh_base0.mat分配给my_mesh对象(ObjectMeshDynamic)的所有表面
	my_mesh->setMaterialPath("materials/my_mesh_base0.mat", "*");
}

int AppWorldLogic::shutdown()
{
	// 删除"materials/my_mesh_base0.mat"材质
	Materials::removeMaterial(Materials::findMaterialByPath("materials/my_mesh_base0.mat")->getGUID());

	return 1;
}Practice实践#
Now let's create an interactive poster in our interior with an ability to change its albedo texture and apply a light filter to the picture (add a tone).现在让我们在室内场景中创建一个可交互的海报,该海报能够切换反照率贴图并应用色调滤镜(添加色调)。
First, we're gonna need a Static Mesh plane.首先我们需要一个静态网格(Static Mesh)平面。
- Go to the archviz/textures folder and find the plane.mesh asset.进入 archviz/textures 文件夹,找到 plane.mesh资源。
- Drag it to the scene (a new Static Mesh object will be created) and change its name to "poster".将其拖拽到场景中(将创建一个新的Static Mesh对象),重命名为"poster"。
-
Set poster's transformation as shown on the image below:按照下图设置海报的变换参数:

- In the Surface Material section create a child material for the surface (click create a child material) to be able to change its parameters and drag the tex01.jpg asset to the Albedo field in the Textures tab.在Surface Material部分,为该表面创建一个子材质(点击create a child material),以便能够更改其参数,然后在Textures(纹理)选项卡中将 tex01.jpg 资源拖放到 Albedo 字段中。
Let's create the Customizable component (inherited from Interactable) that switches textures from the list (the array parameter) on the object — Action(0), and changes the albedo color multiplier by overrriding the method — Action(1). The code of the component looks like this:海报已经准备好,现在让我们创建一个继承自 Interactable 的 Customizable 组件,该组件通过Action(0)在对象上切换列表中的纹理(array parameter),并通过Action(1)重写方法改变albedo颜色乘数。组件代码如下:
#pragma once
#include <UnigineComponentSystem.h>
#include "Interactable.h"
class Customizable :
    public Interactable
{
public:
	// 声明类的构造函数和析构函数,并定义与组件关联的属性(property)名称
	// 首次运行应用程序后,将在项目的data文件夹中生成包含以下所有参数的Customizable.prop文件
	COMPONENT_DEFINE(Customizable, Interactable);

	// 组件参数声明和初始化
	PROP_ARRAY(File, textures);

	// 注册将在世界逻辑相应阶段调用的方法(方法在下面的protected部分声明)
	COMPONENT_INIT(init);

	// 子组件Action方法的重写
	void action(int num = 0);

protected:
	// 声明将在世界逻辑相应阶段调用的方法
	void init();

private:
	int current_texture = 0;	// 当前纹理
};#include "Customizable.h"
// 注册Customizable组件
REGISTER_COMPONENT(Customizable);
using namespace Unigine;
using namespace Math;
void Customizable::init()
{
// 设置鼠标悬停时显示的提示文本
tooltip = "右键点击对象可循环切换列出的材质。按下'TAB'键可随机改变色调。";
}
// 重写子组件的action方法
void Customizable::action(int num)
{
Unigine::ObjectPtr object = checked_ptr_cast<Unigine::Object>(node);
// 选择操作
switch (num)
{
// 循环切换对象材质的反照率纹理列表
case 0:
// 如果纹理列表未设置或为空,则不执行任何操作
if (textures.nullCheck() || textures.size() < 0)
return;
current_texture++;
if (current_texture >= textures.size())
current_texture = 0;
object->setMaterialTexture("albedo", Unigine::FileSystem::guidToPath(FileSystem::getGUID(textures[current_texture].getRaw())), 0);
break;
// 随机改变对象当前材质的反照率颜色乘数
case 1:
object->getMaterial(0)->setParameterFloat4("albedo_color", Math::randColor());
break;
}
}Let's save our files and then build and run our application by hitting Ctrl + F5 to make the Component System generate a property to be used to assign our component to nodes. Close the application after running it and switch to UnigineEditor.让我们保存我们的文件,然后通过按Ctrl + F5来构建并运行我们的应用程序,以使组件系统生成一个属性,用于将我们的组件分配给节点。运行后关闭应用程序并切换到UnigineEditor。
Then let's assign our component to the poster node and fill the texture array (tex01, tex02, tex03).然后将该组件分配给poster节点,并填充纹理数组(tex01、tex02、tex03)。
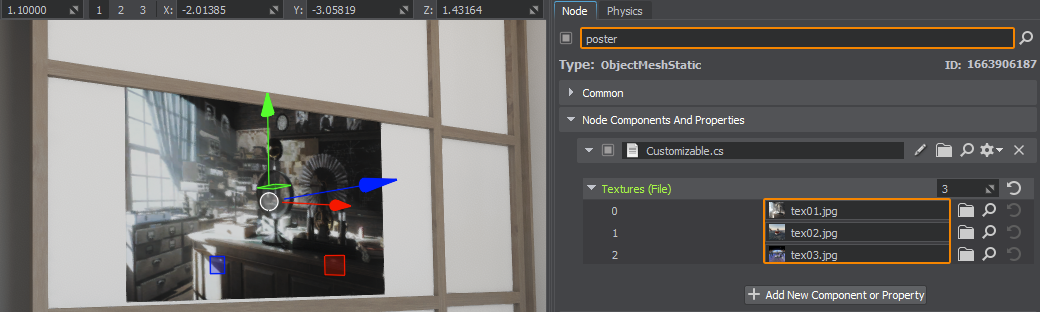
Now the image on the poster can be changed in one click.现在只需点击一次即可更改海报上的图像。
本页面上的信息适用于 UNIGINE 2.20 SDK.