使用Tracker制作动画
 Objects in a three-dimensional world are designed to move. And making them move can be done not only with user input or AI implementation, it can be done with animation. Surely, if you've played games, you've noticed small clips between game episodes, in which movement in the frame is performed according to a certain scenario, like in a movie, or stunning camera fly-throughs displaying shining cars before a race start. To add such dynamic gameplay elements or create in-game cinematic cut-scenes, UNIGINE has the Tracker tool that allows creating animations based on keyframes. It gives developers the ability to:在三维世界中,物体被设计为可移动的。而实现这种移动不仅可以通过用户输入或AI实现,还能通过动画来完成。如果你玩过游戏,必定注意到过游戏章节间的小片段,其中画面运动按照特定剧本执行(如同电影),或是比赛开始前展示闪亮赛车的惊艳镜头飞越。为了添加这类动态游戏元素或创建游戏内过场动画,UNIGINE提供了基于关键帧创建动画的Tracker工具,它使开发者能够:
- Easily create key frames for all nodes in the world, as well as animate movements, camera parameters, and all available render settings.轻松为场景中所有节点创建关键帧,并动画化移动轨迹、摄像机参数及所有可用的渲染设置
- Set up day-night shift and weather conditions change.配置昼夜交替与天气条件变化
- Switch between the cameras, the field of view on the fly and play sounds for creating professional cinematics.实时切换摄像机/视野范围并播放音效,以创建专业级过场镜头
- Animate interactive objects in the game, for example, lighting a torch, opening a door, or moving a platform.动画化游戏中的交互对象,例如点燃火炬、开启门扉或移动平台
- Apply post-processing effects such as DOF, Motion blur, SSR, etc. All these effects can be fine-tuned for each camera view.应用后期处理效果(如DOF、Motion blur、SSR等),所有效果均可针对每个摄像机视图进行微调
- And much more.以及更多功能
Moreover, the Tracker interface supports saving and loading of the created tracks, custom loop ranges, key cloning and snapping, as well as playback speed control. The tool window includes the following elements: track settings, track list, timeline panel and graphical representation of parameter changes.此外,Tracker界面支持:已创建轨道的保存/加载、自定义循环范围、关键帧克隆与吸附,以及播放速度控制。该工具窗口包含以下元素:轨道设置面板、轨道列表、时间线面板,以及参数变化的图形化呈现曲线。
![]()
Key Frame Animation关键帧动画#
Tracker animations consist of a number of tracks and each track indicates how a parameter changes over the specified time. The track can control some render effect or can be bound to a specific node in the world. If you need to animate multiple parameters of one node at the same time, simply create multiple tracks for it. For example, you can use tracks to create animations that:Tracker 动画由多个轨道组成,每条轨道用于表示某个参数在指定时间内的变化过程。轨道可以控制某个渲染效果,也可以绑定到世界中的特定节点。如果你需要同时动画化一个节点的多个参数,只需为其创建多个轨道即可。例如,使用轨道可以创建如下动画:
- Move nodes, toggle skinned animation, control emission of particles, etc.移动节点、触发骨骼动画、控制粒子系统的发射等
- Change any material settings and modify parameters for various configurable effects. For example, you can change the texture and material reflectivity to create the rain effect.修改材质设置或各种可配置效果的参数,例如更改纹理或材质反射率来实现雨天效果
- Change rendering settings: change the background color, apply post-process effects, control stereo and much more.调整渲染设置:更改背景颜色、应用后处理效果、控制立体视图等
- Set up cameras.设置摄像机参数
Key Frames关键帧#
A track is composed of key frames, which are snapshots of the parameter value at a certain time during the animation. Each key frame stores a time and the parameter change (new parameter value or enabled/disabled state). For example, for a node position track, a key frame specifies a new node position along one of the axes; for a node enable track, a key frame indicates whether node rendering is enabled or disabled.轨道由关键帧组成,关键帧是在动画过程中某个时间点上参数值的快照。每个关键帧存储一个时间点和参数变化(新的参数值或启用/禁用状态)。例如,对于节点位置轨道,一个关键帧表示沿某个轴上的新节点位置;对于节点启用轨道,一个关键帧表示节点渲染是启用还是禁用。
This key frame parameter value is set for the interval between the current key frame and the next key frame. Depending on the transition mode, the key frame values can be switched abruptly or smoothly interpolated:该关键帧的参数值适用于当前关键帧与下一个关键帧之间的时间段。根据过渡模式的不同,关键帧的数值可以是突然变化的,也可以是平滑插值的:
- Linear interpolation can be used, for example, for a node scaling track.线性插值可以用于节点缩放轨道
- Bezier interpolation will provide a smooth curve for a node position track.贝塞尔插值会为节点位置轨道提供平滑的曲线
In the Tracker panel you can switch transition modes and set keyframe parameters (time and value).你可以在 Tracker 面板中切换过渡模式,并设置关键帧参数(时间和值)。
![]()

|
|
|---|---|

|
|

|
|

|
|

|
|

|
Remove selected key frames.删除选中的关键帧。 |

|
Snapping mode for key frames. When a key frame is dragged along the track line, this mode pulls a keyframe into alignment with other key frames (on the same or other tracks). It can also be enabled by holding ALT.关键帧吸附模式。当沿轨道线拖动关键帧时,此模式会将关键帧与其他关键帧(同一轨道或其他轨道)对齐。也可通过按住ALT键启用。 |
Practice实践#
Now let's try to create a track for animating the camera movement (so called fly-through) in our interior scene, for this purpose let's open the scene in the editor.现在让我们尝试为室内场景创建一个摄像机运动动画轨道(即所谓的飞行动画),为此我们需要在编辑器中打开场景。
To open the Tracker tool, choose Tools → Tracker from the main menu.要打开Tracker工具,请从主菜单中选择Tools → TrackerTools → Tracker。
To create a track with key frames to animate a parameter (rendering setting, node or material parameter, etc.):要为参数(渲染设置、节点或材质参数等)创建包含关键帧的动画轨道:
- Add a track that will animate the movement of our camera: Click
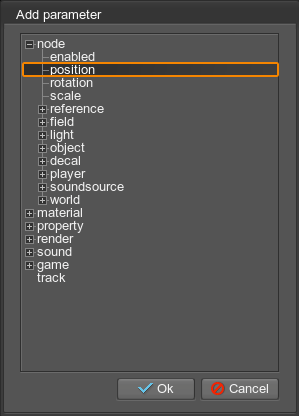
 . This will open the Add Parameter window.添加一个控制摄像机移动的轨道:点击。这将打开Add Parameter(添加参数)窗口。
 -
Select a parameter from the list, in our case it will be node → position.从列表中选择参数,本例中选择node → position。
-
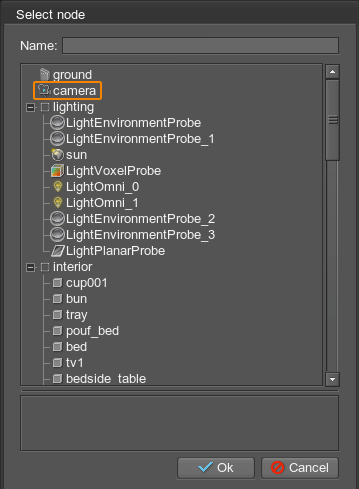
Since the track animates the movement of the camera (Player) node, you must bind it to a specific node in the Select Node window that opens. Select the camera node and click Ok.由于该轨道将动画化camera(Player)节点的移动,你需要在弹出的Select Node(选择节点)窗口中将其绑定到特定节点。选择camera节点并点击OK。
- The track is added, now let's do the same for the node → rotation parameter (we will change the camera rotation as well).轨道添加完成后,现在为node → rotation参数执行相同操作(我们也将改变摄像机旋转)。
-
Now let's set the duration of our clip, click
 on the panel at the bottom to open the settings.接下来设置片段时长,在底部面板点击打开设置。
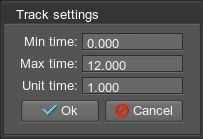
- In this window we will specify the beginning (0) and the end (12) of our clip – it will last 12 seconds. By the way, the third parameter (Unit Time) is used as a scaling multiplier, using it alone you can make the clip play faster or slower.在此窗口中指定片段的起始(0)和结束(12)时间:片段将持续12秒。顺便说明,第三个参数(Unit Time)用作时间缩放乘数,仅调整此参数即可让片段播放更快或更慢。
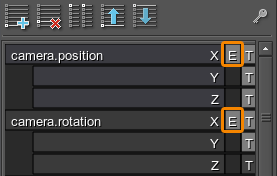
Now everything is ready to start working with key frames directly. You can set time and parameter values manually in the Time and Value fields in the panel — by double-clicking to add a key frame and using the buttons on the timeline, but we'll make it easier. By default in the Editor, the display is automatically bound to the Tracker (i.e. if you move the current time slider on the timeline, the corresponding node or parameter will change according to the track). In this case, the node the position of which is controlled by the track can't be moved anywhere (it will always return to the track point). So first of all, let's disable binding to the track by clicking the E icons next to the camera.rotation and camera.position tracks.现在一切准备就绪,可以直接开始处理关键帧了。你可以通过在面板的Time和Value字段中双击添加关键帧,并使用时间轴上的按钮来手动设置时间和参数值,但我们将采用更简便的方式。默认情况下编辑器中显示会自动绑定到Tracker(即当你移动时间轴上的当前时间滑块时,相应节点或参数会根据轨道变化)。这种情况下,被轨道控制位置的节点无法被手动移动(它将始终返回轨道点)。因此首先,我们需要通过点击camera.rotation和camera.position轨道旁的E图标来禁用轨道绑定。
Then do the following:接下来按以下步骤操作:
-
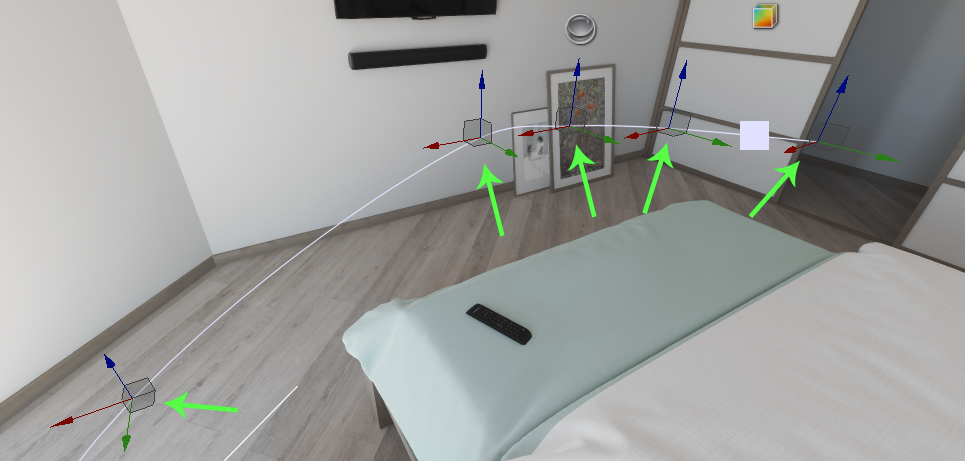
Switch to the camera view in the viewport and, controlling the camera, set it to the first position and rotate it as you want. Then move the timeline slider to the point in time when you want the camera to occupy the set position (say 0.5 seconds from the start).切换到视口的camera摄像机视图,通过控制摄像机将其移动到第一个目标位置并调整好旋转角度。然后将时间轴滑块拖动到你希望摄像机到达该设定位置的时间点(比如开始后0.5秒)。
- Now that the position and rotation for the first frame are set, select the camera.position track by clicking on its title and click the
 button. Tracker will automatically create a key frame for the moment specified on the timeline and record the current camera position in it. Now select the track for camera rotation (camera.rotation) and click the button again to also record the current rotation for the same point in time. The first keypoint is ready! You just need to make a smooth transition.现在第一帧的位置和旋转已设置完成,点击标题选中camera.position轨道并点击按钮。Tracker将自动在时间轴指定位置创建关键帧,并记录当前摄像机位置值。接着选中摄像机旋转轨道(camera.rotation),再次点击按钮为同一时间点记录当前旋转值。第一个关键帧就设置完成了!现在只需设置平滑过渡效果。
 - To make a smooth transition, select all points of the key frame and click the button on the top panel of Tracker.要创建平滑过渡,选中关键帧的所有控制点并点击Tracker顶部面板上的按钮。
- Repeat the same for other points by moving and rotating the camera, sliding the current moment slider on the timeline and pressing the button for each track.对其他关键点重复相同操作:移动和旋转摄像机,滑动时间轴上的当前时刻滑块,并为每个轨道按下按钮。
-
When all points are placed, you can play the track using the buttons on the panel below (once or repeatedly).当所有关键点设置完成后,你可以使用下方面板上的按钮播放轨道(单次或循环播放)。

During playback, you can switch to the Editor Camera view in the viewport and see how the camera node moves along the trajectory. Here you can also move the manipulators placed at key points to change the trajectory in real time.在播放过程中,你可以切换到视口中的编辑器摄像机(Editor Camera)视图,观察摄像机节点(camera)如何沿轨迹移动。在此你还可以实时移动关键点处的操纵器来调整轨迹。
The last thing left to do is to save our track, so that it can be used further (for example, to play the fly-through from code, as in cutscenes).最后一步是保存我们的轨道,以便后续使用(例如通过代码播放飞行动画,就像过场动画那样)。
To save the track to a *.track file, click Save and in the dialog box that opens, specify the name of the track file — let's call it camera_animation.track and save it to the data/tracks folder.要将轨道保存为*.track文件,点击Save按钮,在弹出的对话框中指定轨道文件名——我们将其命名为camera_animation.track并保存到data/tracks文件夹。
If there are several tracks in the current list (as we have for rotation and movement), they will all be saved to a single *.track file.如果当前列表中有多条轨道(如我们设置的旋转和移动轨道),它们都将被保存到同一个*.track文件中。
To load a previously saved track, click Load and select the track file in the dialog box that opens.要加载先前保存的轨道,点击Load按钮并在弹出的对话框中选择轨道文件。
You can also use Tracker to mix several animations stored in different files into one and make complex video scenes.你还可以使用Tracker将存储在不同文件中的多个动画混合为一个,制作复杂的视频场景。
本页面上的信息适用于 UNIGINE 2.20 SDK.